How to create client-side form modal and validate it using JavaScript

I write for Fun☺️, creativity at it peak. I’m also a Product Designer who loves color and simplicity.
Introduction
It can be so frustrating after filling numerous form fields on a web-page and just when you thought you are done, and hit the summit button, it refreshes the whole thing and then points out an error message.
Wouldn’t it be nice to automatically cross-check as you type your data? Well, JavaScript can make that possible.
One of the many hat JavaScript can wear is its ability to check for the correctness of form fields before summiting to the server. It's also your first line of defense against bad form data. Which is pretty helpful.
Goal
This article leads you through basic concepts and examples of client-side form validation. How to create modal with form fields and how to use JavaScript to validate those fields.
Prerequisites
- Basic computer knowledge.
- Basic understanding of what programming is all about.
- Basic understanding of HTML, CSS and JAVASCRIPT.
What is Form Validation?
Is a quick check of the correctness of your inputted information on a form-fields. When you click on a summit button, rather than summiting it directly, it cross-checks immediately and point out the error if there are any.
So without wasting much time. Let’s go ahead and create one.
HTML
<body>
 <button type="submit" class="modal-activator">open modal</button>

<div class="main-con">
    <div class="modal-con">
        <div class="text-box">
           <h1>Sign up</h1>
           <h2>HashnodeModal</h2>
        </div><br>
       <form name="myForm"  action="" method="get">
           <input type="email" name="email" placeholder="email" class="input" required>
           <input type="tel" name="tel" placeholder="telephone" class="input" required>
           <input type="sex" name="sex" placeholder="sex" class="input" required>
           <input type="password" name="password" placeholder="password" class="input" required>
           <button type="submit"  class="btn">summit</button>
       </form>
    </div>
</div>

     <script src="../js/script.js"></script>
</body>
Note: the required attribute used in the input fields up there is very important. It specifies that an input field must be filled out before submitting the form. The required attribute only works with the following input types: text, search, url, tel, email, password, date pickers, number, checkbox, radio, and file.
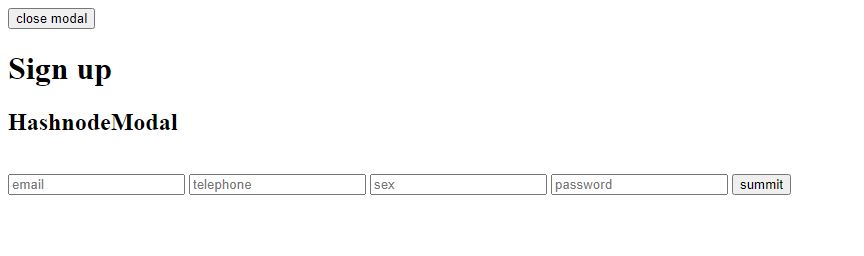
* What you should see without the CSS code. *
CSS
.main-con{
    justify-content: center;
    height: 100vh;
    width: 100vw;
    align-items: center;
    flex-direction: column;
    display: flex;
    position: fixed;
    left: 0;
    top: 0;


}
.modal-con{
    width: 400px;
    height: 200px;
    background-color: #f1f1f1;


}

h1{
    font-size: 20px;
    margin: 10px 37px;
}
h2{
    font-size: 18px;
    margin: 10px 37px;

}
.text-box{
    width: 400px;
    color: #fff;
    background-color: #c9bdbd;
    display: flex;
    justify-content: space-between;
}
input{
    border: 0px;
    border-bottom: 2px;
    width: 120px;
    height: 30px;
    margin: 10px 0px 0px 37px;
    border-radius: 8px;
    padding-left: 20px;
    box-shadow: 0px 0px 4px 0px#c9c4c4;
}
.btn{
    width: 80px;
    background-color: #e9e9e9;
    height: 30px;
    margin: 10px 0px 0px 160px;
    border-radius: 8px;
    padding: 2px;
    border: 3px solid #c9bdbd;;

}
.btn:hover{
    border: 2px solid #c9c4c4;
    background-color: #fff;

}
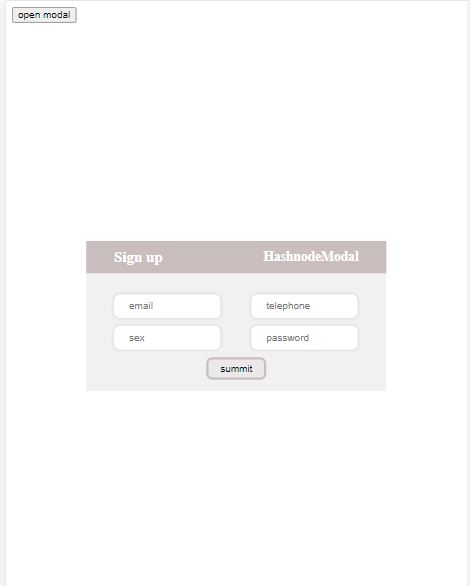
The result you should see with the CSS code in it
 the
the required attribute forcing you to input values before it can summit.
If you got exactly what is on the image above, you are doing great! Now let’s add some interactive and functionality to our beautiful modal. Shall we?
JavaScript
const modalBg = document.querySelector(".main-con");
const btn = document.querySelector(".modal-activator");
const inputs = document.querySelectorAll(".input").values;

btn.onclick = function () {
    modalBg.style.display = "flex";
 }

// To target when the modal is not clicked on,
// and to close it when we click on something else
window.onclick = function(event){
    if(event.target == modalBg){
        modalBg.style.display = "none"
        btn.textContent="open modal";

    } else{
        btn.textContent="close modal";
    }
}
myForm.addEventListener("submit",(e)=>{

    // Prevent default behavior of submission which
    // causes page reload
    e.preventDefault();

    // To declare and get the value of each fields
    let email = myForm.email.value;
    let tel = myForm.tel.value;
    let sex = myForm.sex.value;
    let password = myForm.password.value;
    console.log({ email, tel, sex, password});
    document.body.innerHTML="You have successfully registered your account!";
});
Note: comments are made on the JavaScript code above stating the functionality of some major lines of code.
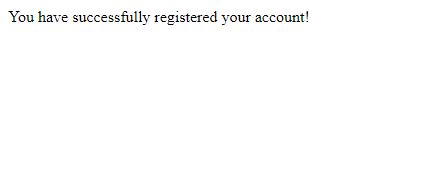
On clicking the summit button, you should have something that look exactly like the below image. Saying “You have successfully registered your account! “. If you did, congrats!🎉 you just created a beautiful modal with a client-side validation functionality. Well done!
i love reading comments about my article. So do well to leave a comment below about what your suggestions may be and what other method you think works

